
 |
| CB after successful refinishing |
Centerboard Refinished
In preparation for the 100 mile WaterTribe NC Challenge, the Dawn Patrol's centerboard (CB) needed to be refinished. We had noticed a crack between the horn and the blade while we were sailing with Spartina in June. We could also see "oyster-shell" wear on the tip of the blade.
The process of removal, refinishing, re-installation, and testing (during the NCC) was successful. Details of the process --far beyond what anyone should want to know-- are illustrated below.
The process of removal, refinishing, re-installation, and testing (during the NCC) was successful. Details of the process --far beyond what anyone should want to know-- are illustrated below.
How long does a CB last? Wooden parts that are encapsulated in epoxy have to be monitored. Any cracks, dents, damage or water infiltration deserve repair.
Sometime in the next year or two we may want to replace the CB with a newly built lead-weighted CB that will require a remodeled trunk. This original CB should last until then now that it has been refinished.
Sometime in the next year or two we may want to replace the CB with a newly built lead-weighted CB that will require a remodeled trunk. This original CB should last until then now that it has been refinished.
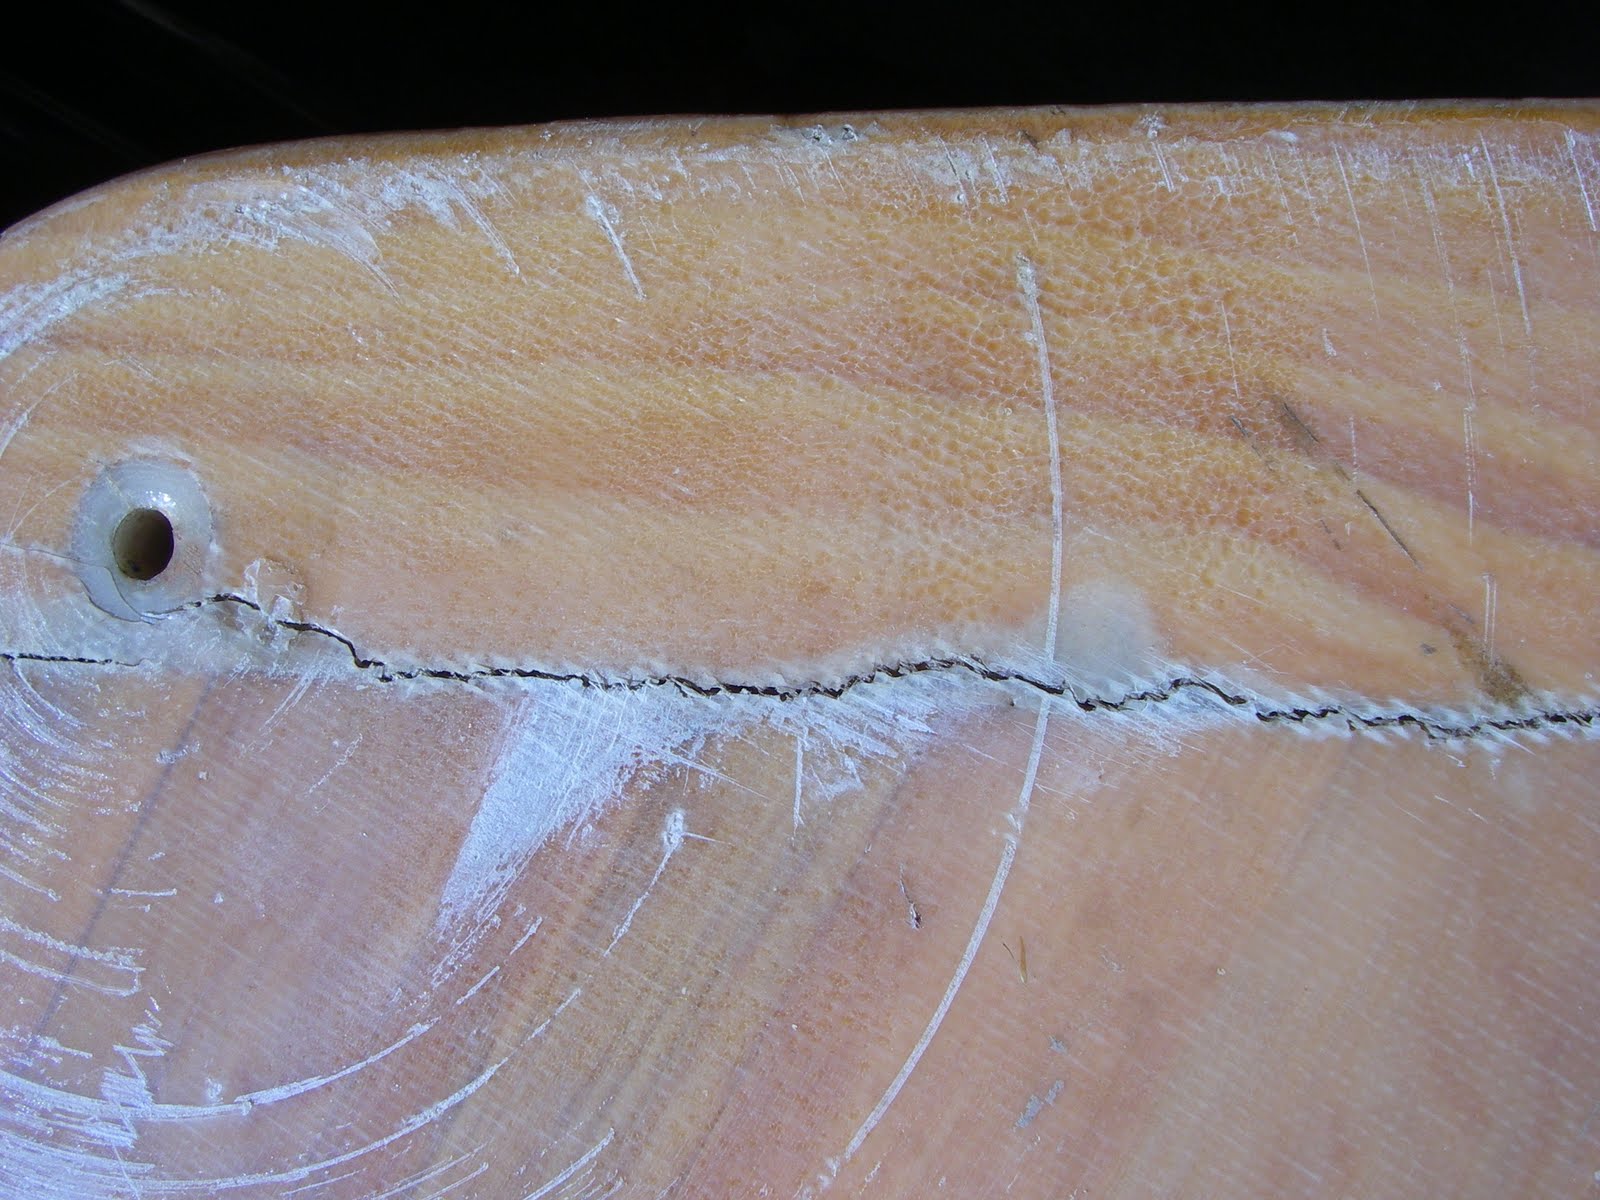
Look at that crack!
It appeared that water infiltrated the wood via a crack. SandyBottom: "Hmm maybe this explains why that centerboard seemed tight, likely swelling from water in the crack."
SOS: "I don't think the damage is from hitting big rocks. Looks like water infiltration."
 |
| Port side: abrasion, crack, water damage |
 |
| Port side: abrasion, crack, water damage |
 |
| Port side: abrasion, crack, water damage |
 |
| Port side: abrasion, crack, water damage |
 |
| Port: "oyster-shell" abrasion near the epoxy-hardened nylon-rope edge |
 |
| Starboard: "oyster-shell" abrasion near the epoxy-hardened nylon-rope edge |
The board appeared to be fixable, despite the crack, so we undertook repairs and refinishing. The handle is bolted into the blade (with 3 countersunk 4" SS screws). The crack appeared on the port side but not the starboard side of the CB. With the repairing and refinishing, we hope to have a few more months of use of this CB.
Belt-Sanding the CB
After removing it from the boat, I took the CB to the wood-working shop at Fitch Lumber in Carrboro and asked the helpful folks there to run the CB through their planer to take off 1/16 of an inch on each side. Their planer uses a large sanding belt (rather than knife blades) so it works well on composite materials such as this. Cost: $5. Time: 5 minutes. Here is the result ....
 |
| Starboard side after pass through the planer |
 |
Port side after pass through the planer |
 |
| Port side has crack |
 |
| Starboard side |
Epoxy Repair and Fiber glassing
Warming the wood prior to applying epoxy may have helped to draw the thin epoxy into the cracks. This was followed by application of a small amount of thickened epoxy in the cracks. Next, some new layers of 6 oz fiberglass cloth were on each side. While doing this, the leading edge, trailing edge and tip were encapsulated in epoxy. The trailing edge can thus become razor-sharp. Result...
 |
| Ready for final coats of epoxy. |
Re-installation
Installing the CB in the boat again, as well as removing it prior to the refinishing work, was the tedious part of the entire process.
The CB pivots on a 3/8"-diameter stainless steel (SS) pin. The pin is captured by port and starboard wooden disks ("caps".) Each cap is held in place by 3 SS screws. The CB and pivot pin are exposed to water, of course, so a silicone gasket between the cap and the trunk is necessary. To create this, 100% silicone gel is applied to the cap.
The CB pivots on a 3/8"-diameter stainless steel (SS) pin. The pin is captured by port and starboard wooden disks ("caps".) Each cap is held in place by 3 SS screws. The CB and pivot pin are exposed to water, of course, so a silicone gasket between the cap and the trunk is necessary. To create this, 100% silicone gel is applied to the cap.
 |
| Starboard cap is in a storage hatch in cabin |
The port cap is located and easily accessed in the footwell inside the cabin. In contrast the starboard cap is deep inside a storage compartment in the cabin --so I would need to become a human pretzel or shrink to the size of a puppy to easily access it. It is easy to see, or easy to reach, but not easy to reach while you can see it.
Webcam technology seemed promising but the images were slightly time-delayed. Ultimately the human pretzel approach was required. I managed to take care of the removal stage, and re-installation of the port cap. Alan arrived just in time to reinstall the starboard cap. Thanks Alan!
New Caps
The caps put in place during the re-installation were newly created from marine plywood; the original caps were slightly damaged during the initial removal step. Making new caps was easy: epoxy-sealed disks of plywood made with epoxy-lined screw holes. Piece of cake.
Slotting the CB into the trunk
Adequate access to the CB slot at the beginning and end of the process required sliding the boat a few feet off its trailer.
 |
| Boat slid back 4 feet |
 |
| Supporting the stern with 6x6 cut-offs |
In normal position on the trailer, the CB comes to rest on the center roller of the trailer if released.
Appreciation
Thanks to Alan for his assistance and expert advice.
Appreciation
Thanks to Alan for his assistance and expert advice.


No comments:
Post a Comment